Getting started with Portainer -the Best GUI for Docker and Kubernetes.
portainer.io
What is Portainer
Portainer is a powerful, open source toolset that allows you to easily build and manage containers in Docker, Docker Swarm, Kubernetes and Azure ACI. Portainer hides the complexity of managing containers behind an easy-to-use UI. By removing the need to use the CLI, write YAML or understand manifests, Portainer makes deploying apps and troubleshooting problems so easy that anyone can do it.
Portainer is designed for organizations that don't have access to container management expertise, but want to exploit the power of containers today.
Features of Portainer
With an intuitive GUI and a set of sane defaults that get users up and running fast, Portainer dramatically reduces the need for teams to learn Docker and Kubernetes, which leads to faster adoption and time savings right across the organization.
- It reduces the operational complexity associated with containers, which speeds up adoption and reduces errors
- It addresses critical skill shortages by making the technology safely accessible to everyone inside the organization
- It simplifies the setting-up of 'safe' security configurations within Docker and Kubernetes through centralized IAM
Portainer Architecture
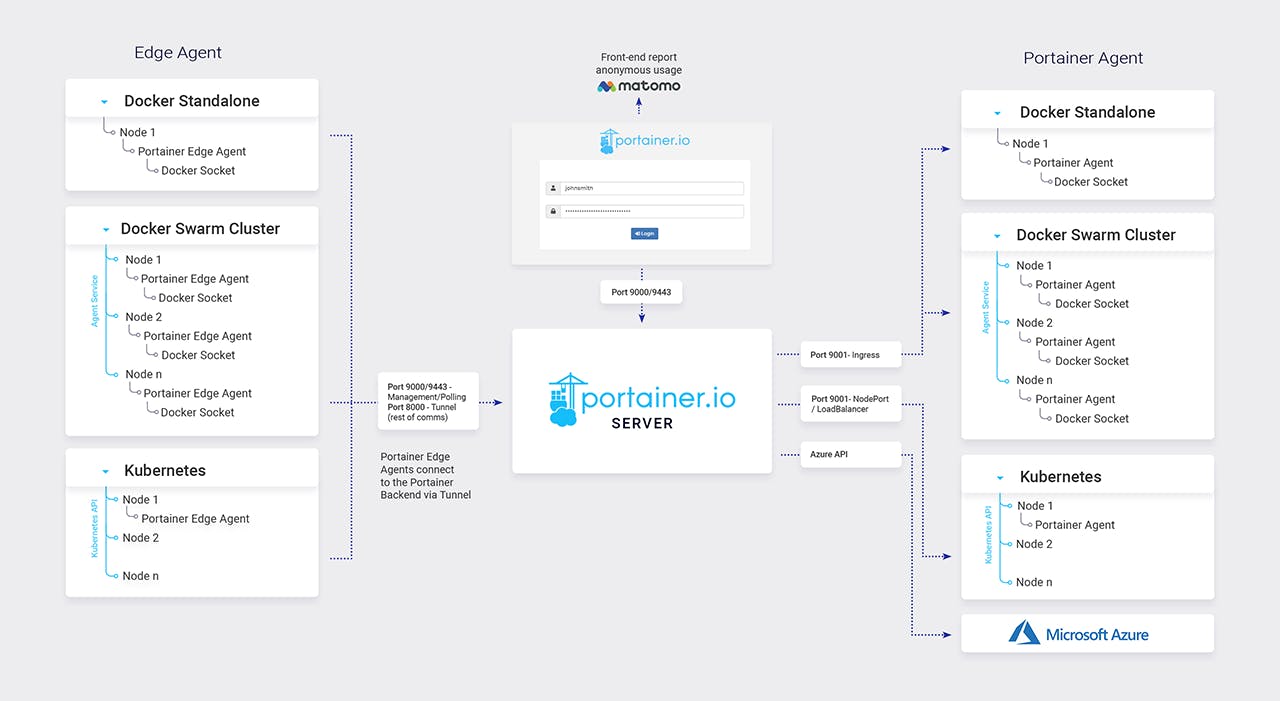
Overview of Architecture
Portainer consists of two elements: the Portainer Server and the Portainer Agent. Both run as lightweight containers on your existing containerized infrastructure. The Portainer Agent should be deployed to each node in your cluster and configured to report back to the Portainer Server container.
A single Portainer Server will accept connections from any number of Portainer Agents, providing the ability to manage multiple clusters from one centralized interface. To do this, the Portainer Server container requires data persistence. The Portainer Agents are stateless, with data being shipped back to the Portainer Server container.

Security and Compliance
Portainer runs exclusively on servers, within your network, behind your own firewalls. As a result, we do not currently hold any SOC or PCI/DSS compliance because portainer do not host any of our infrastructure. We can even run Portainer completely disconnected (air-gapped) without any impact on functionality.
While we do (optionally) collect anonymous usage analytics from Portainer installations, we remain compliant with GDPR. Data collection can be disabled when you install the product, or at any time after that. If your installation is air-gapped, collection will silently fail without any adverse effects.
Getting Started
Installation
The Community Edition of Portainer is free, open source and straightforward to install. There are two options: installing new or adding an environment to an existing installation.
Here we will see the fresh installation of Portainer via Kubernetes platform.
Introduction
Portainer consists of two elements, the Portainer Server and the Portainer Agent. Both elements run as lightweight containers on Kubernetes. To get started, you will need:
- A working and up to date Kubernetes cluster.
- Access to run helm or kubectl commands on your cluster.
- Cluster Admin rights on your Kubernetes cluster. This is so Portainer can create the necessary ServiceAccount and ClusterRoleBinding for it to access the Kubernetes cluster.
- A default StorageClass configured.
Data Persistence
Portainer requires data persistence, and as a result needs at least one StorageClass available to use. Portainer will attempt to use the default StorageClass during deployment. If you do not have a StorageClass tagged as default the deployment will likely fail.
You can check if you have a default StorageClass by running the following command on your cluster:
kubectl get sc
and looking for a StorageClass with (default) after its name:
root@kubemaster01:~# kubectl get sc
NAME                            PROVISIONER                                   RECLAIMPOLICY   VOLUMEBINDINGMODE   ALLOWVOLUMEEXPANSION   AGE
managed-nfs-storage (default)   k8s-sigs.io/nfs-subdir-external-provisioner   Delete          Immediate           false                  11d
To set a StorageClass as default, you can use the following:
kubectl patch storageclass <storage-class-name> -p '{"metadata": {"annotations":{"storageclass.kubernetes.io/is-default-class":"true"}}}'
replacing <storage-class-name> with the name of your StorageClass. Alternatively, if you are installing using our Helm chart, you can pass the following parameter in your helm install command to specify the StorageClass to use for Portainer:
--set persistence.storageClass=<storage-class-name>
Deployment To deploy Portainer within a Kubernetes cluster you can use our provided Helm charts or YAML manifests. ### Deploy using YAML manifests Our YAML manifests support exposing Portainer via Nodeport-
To expose via NodePort, you can use the following command (Portainer will be available on port 30777 for HTTP and 30779 for HTTPS):
kubectl apply -n portainer -f https://raw.githubusercontent.com/portainer/k8s/master/deploy/manifests/portainer/portainer.yaml
Logging In
Now that the installation is complete, you can log into your Portainer Server instance. Depending on how you chose to expose your Portainer installation, open a web browser and navigate to the following URL:
Initial Steps
Once the Portainer Server has been deployed, and you have navigated to the instance's URL, you are ready for the initial setup.
Creating the First User
 Connecting Portainer to your environments
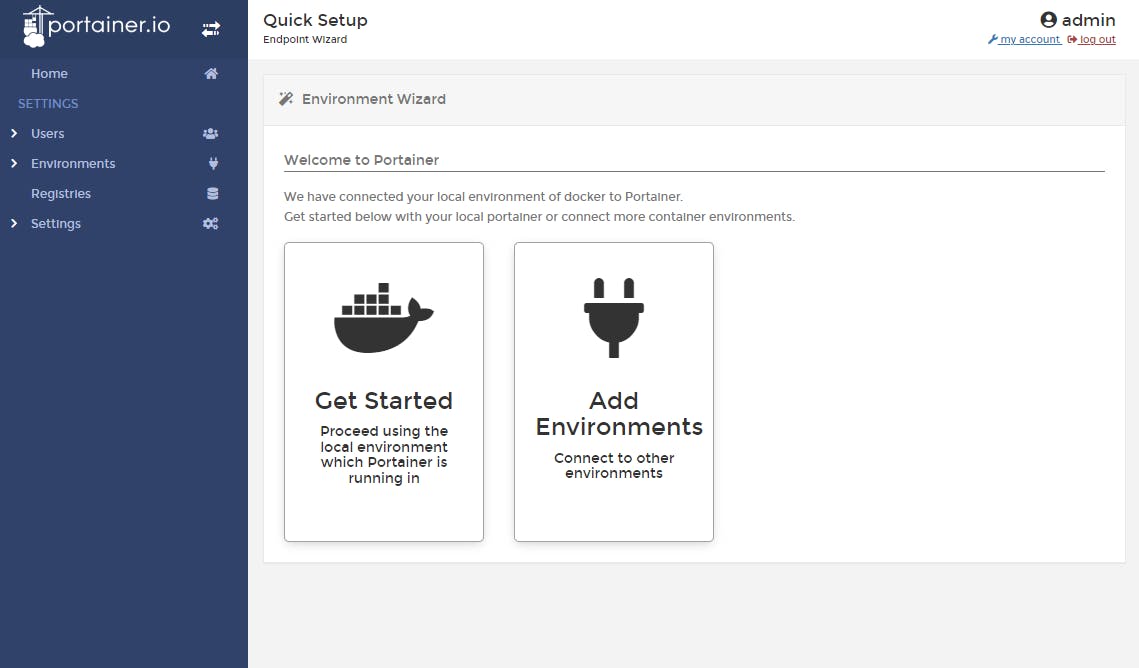
Once the admin user has been created, the Environment Wizard will automatically launch. The wizard will help get you started with Portainer.
 The installation process automatically detects your local environment and sets it up for you. If you want to add additional environments to manage with this Portainer instance, click Add Environments. Otherwise, click Get Started to start using Portainer!
What are the pros of Portainer?
For beginners, utilization of Portainer enables them to start using containerized applications right away. Therefore, reduces the Docker learning or Kubernetes learning curve a lot.
Docker developer-friendly. Containers just work and you use less time to run them.
Operations, documentation, and monitoring gets easier due to the simple graphical interface.
You can edit the containers and re-deploy them in a matter of seconds saving time for those who require quick environment variable changes.
Web graphical interface makes monitoring and container management simpler than CLI and takes the weight off your mind.
Conclusion
If you are using containerized applications and need to manage your containers with less time and want to have quick visibility of the status of your containers you will probably like using Portainer.
Important Links
Portainer official website- https://www.portainer.io/
Portainer Documentation- https://docs.portainer.io/v/ce-2.11/
Portainer Github Repo- https://github.com/portainer/portainer
Walkthrough of Portainer 2.9- https://www.youtube.com/watch?v=irJ5SSvEpvQ
Manage Multiple Hosts- https://www.youtube.com/watch?v=kKDoPohpiNk
Thanks for reading the blog, hope you learned something from this, if you did then do share it on twitter & linkedin and tag me at:
